The table router has three basic parts, Table Bed, Adjustable Fence and the actual router (below the Table Bed except for the bit).
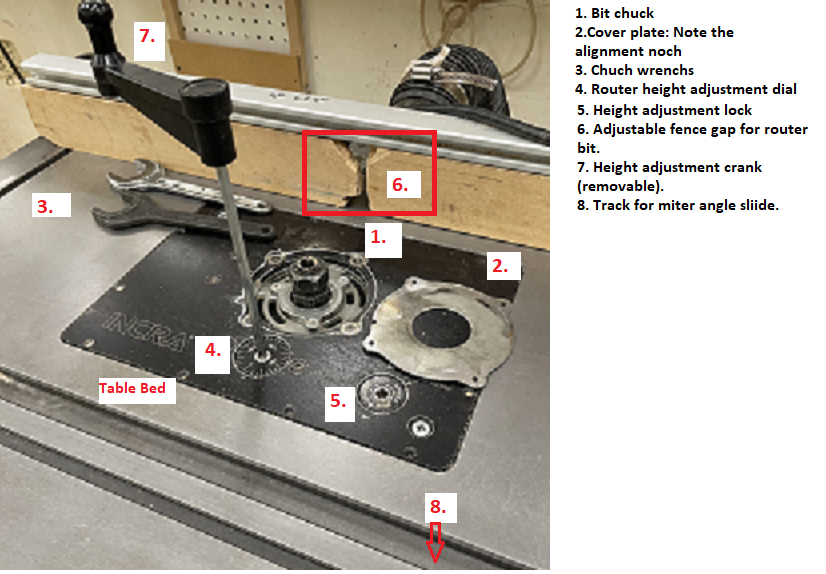
- the Router Chuck which holds the cutting bits. Club chuck only take 1/2″ shaft bits.
- A removable cover plate which gives access to the Router Chuck to position the bit. When installed this provides a flat surface in line with the Table Bed. These come with a verity of hole sizes to accommodate different size bits. These will be hanging on the wall behind the Table Router. There are four tabs on the cover plate, which has to be aligned with a notch in the Router opening. The notch has two functions first align the tabs on the cover plate with the four magnetic cut outs on the Router Opening, it will only go one way. The second is to provide an opening to use when removing the Cover Plate. An awl works well to pry the Cover Plate up from the magnets.
- A set of wrenches that are used to tighten the Router Chuck on the bit. These also hang on the back wall.
- Router Height adjustment dial. This allows you to raise or lower the bit to the proper cutting height using the removable crank #7. The dial has graduations to indicate the distance raised or lowered. Raising the router gives access to change bits.
- Height Adjustment lock. Once the Router bit height is set it can be locked in place with the position lock and the crank #7. Locking only requires about a half turn. Be sure to always loosen the lock before raising or lowering the chuck. Always relock the chuck when at your desired height. It is a sad moment to remove a piece you have just cut to find the bit has moved and the cut at the end doesn’t match the beginning.
- the Adjustable Fence Gap can be opened or closed to accommodate different bit diameters. Once set the Gap can be locked in place with thumb screws on the back side of the fence. It is best not to have a gap between the bit and the edge of the Fence Gap of more than a half inch. The fence is adjustable forward or backwards to a position straddling the bit to give the proper depth of the cut. The fence is locked in place with thumb screws also in back of the fence. The material is fed along the fence from right to left to make cuts. When looking down on the bit it rotates counterclockwise. By feeding material from right to left, the bit will pull the material to the fence to give uniform depth to the cut. It is a good practice to use a horizontal feather board to press the material to the fence. And a Verticle-Feather-Board to hold the material tight to the table. This is not only to get uniform cuts but pressing your material with your hands can be dangerous for your fingers if the material should slip and expose the spinning bit.
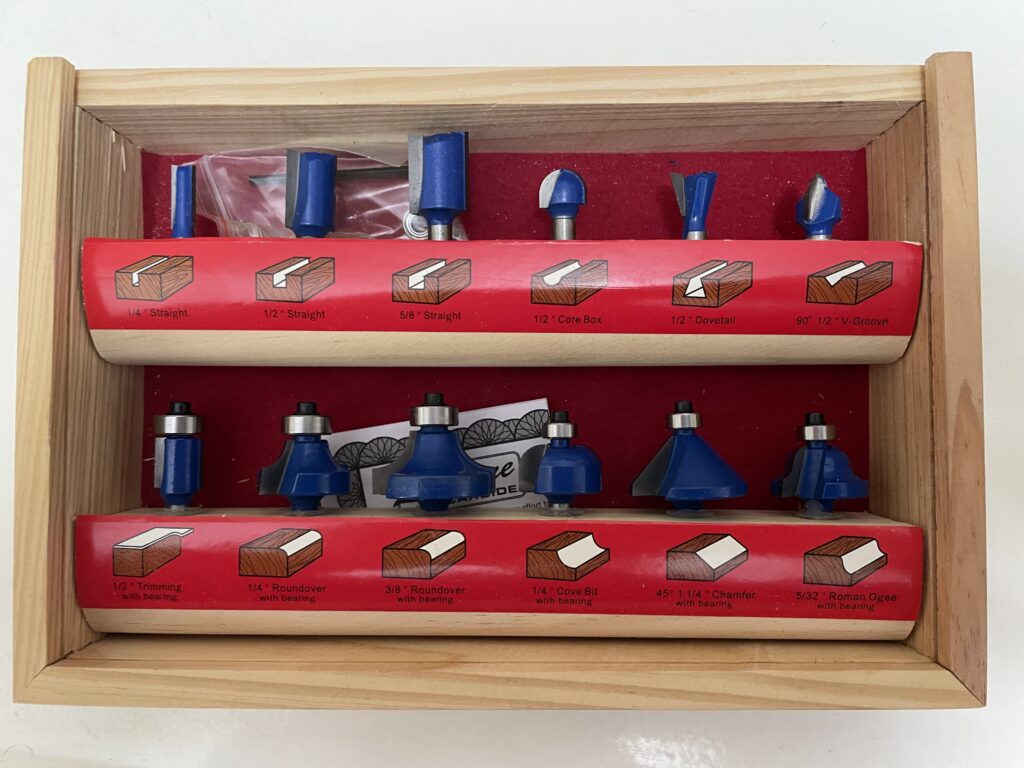
Above are a sampling of the type of bits that you can check out from the tool crib. You can see a sample of the type of cuts they will make below each bit. The bottom row is for edge cuts. These have a stainless-steel wheel at the top. The wheel will follow the part of the edge not being cut to give a uniform cut.
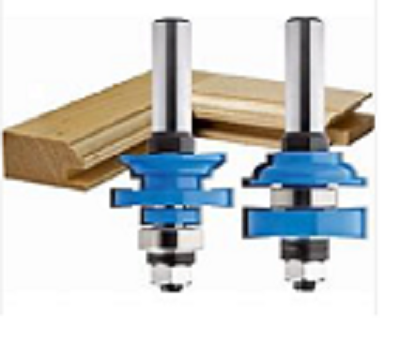
The tool crib also caries several “Matched Bit” sets. These are used for making things like stile and rail doors where the rail fits into the stile at a 90-degree angle to form a corner. A slot is also cut in both the stile and rail to hold a panel.
NOTE: If you buy a bit to use at the club those routers only use 1/2″ shank bits. Homeowner personal routers are normally 1/4″ shank and are very common but won’t work on club routers.
Router Table Operation and Safety
1. Unplug router from wall; and make sure shaper main power is shut off (in down
position); when changing bits. Open vacuum vent.
2. Do not let bit bottom out in the collet when installing it. Drop it down, and then lift it up about 1/8”. This
prevents the bit from freezing up in the collet and makes for easier removal.
3. Make sure wrenches are put in rack and tabletop is clear of objects before turning
machine on
4. Make sure bit clears the fence
5. Lock adjusting clamp of router before turning machine on.
6. Hold work firmly when cutting (use both hands). For small pieces or end grain use a holder
7. Push into rotating bit (right to left)
8. Do not make machine adjustments when bit is turning
9. For better work (less splintering) make several shallow cuts (< 1/8”)
10. Never pass wood between bit and fence. Bit should be inside the fence opening and not protrude more then half way beyond the outer edge.
11. Open vacuum before and close when finished. Hook shop vacuum hose to fence for less
mess to clean up
12. Use guards and feather boards
13. If using bit with bearing, bring fence up to the bearing on the bit. This makes it easier for
vacuum to suck up wood chips.
14. When using a bit without a bearing, the fence has to be in front of the middle of the bit.
Make sure left and right fences are both lined up with each other.
15. If cutting a dado or cove in the board, use feather board on the top to keep board from
rising up and on the edge to keep board tight against the fence and on table to hold material tight to fence.
16. Clean up mess when finished (open front shaper panel to clean out inside)
17. Close vacuum vent.