
Description
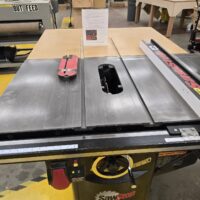
A SawStop table saw is a highly advanced precision woodworking machine designed to perform accurate ripping, crosscutting, and dado operations while incorporating an active injury-mitigation system. Unlike conventional table saws, the SawStop integrates mechanical, electrical, and electronic safety systems that work together to reduce the risk of severe injury.
In addition to a high-power motor and precision arbor assembly, the saw includes a blade brake cartridge, detection electronics, a riving knife system, blade guards, and multiple interlocks that must be correctly configured for safe operation. The saw continuously monitors electrical signals at the blade to detect contact with conductive materials, including the human body. When triggered, the system stops and retracts the blade in milliseconds.
Because of this complexity, a full understanding of the machine’s setup, operating modes, and safety systems is imperative. While routine operation is the responsibility of the user, maintenance, inspection, and replacement of the brake system are handled exclusively by trained maintenance personnel. Operators must never attempt to service, adjust, or bypass the brake system or related safety components.
Improper blade selection, incorrect operating modes, or misuse of safety features can disable protective systems, damage the saw, or create hazardous conditions. Operators must understand not only how to make a cut, but how their actions affect the SawStop’s safety systems.
When properly configured and used by trained operators, a SawStop table saw provides exceptional accuracy and a significantly higher level of safety. Its advanced design demands strict adherence to training, procedures, and shop policies to ensure safe and reliable operation.
⚠️ Warnings
Brake activation policy: Any SawStop brake activation caused by operator error will result in a $150 charge to the responsible member.
Wet or conductive material: Do not cut wet wood or any material containing metal, fasteners, or embedded debris. These materials can trigger the brake system. Tape measures should never contact the blade. To be safe find other ways to measure!
Blade contact hazard: Never allow hands, fingers, or any body part to contact the blade while it is running or coasting after the stop paddle is pressed.
Brake arming delay: The SawStop brake system remains armed for up to 15 seconds after the blade stops. Contact with the blade during this period can still trigger the brake.
No user serviceable parts: Members must never attempt to adjust, service, disable, or bypass the brake system. All brake maintenance is performed by authorized maintenance personnel only.
Usage Instructions
Before Operating
- You are not wearing long sleeves, gloves, jewelry, or loose clothing.
- Safety glasses are on and properly fitted.
- The work area is clear of tools, scrap wood, and any loose materials.
- All material to be cut has been inspected and is free of nails, screws, staples, or metal of any kind. A metal detector is located just to the right side of the maintenance room door.
- A push stick is available and ready for use if required.
- The status light on the On/Off switch is GREEN, indicating the saw is ready for operation (see below).
Adjusting the Blade Height
- Set the blade height before starting the saw. Blade height must be adjusted with the machine powered off.
- Minimum-height setting: The blade may be set so the top of the teeth are just above the surface of the material being cut.
- Recommended height setting: Setting the blade slightly higher than the workpiece is preferred, as it reduces the number of teeth in contact with the wood.
- Kickback reduction: Fewer teeth engaged in the cut lowers the risk of kickback.
- Reduced machine strain: A higher blade setting reduces strain on both the blade and motor during cutting.

Raising the Saw Blade
- Use the elevation wheel to raise or lower the blade height.
- Turn the hand wheel clockwise to raise the blade.
- Turn the hand wheel counterclockwise to lower the blade.
- Set the blade to the desired height before operating the saw.
- Tighten the elevation lock knob to prevent the blade from moving during operation.
- Loosen the elevation lock knob before making any blade height adjustments.
- Lower the blade fully when finished using the saw.

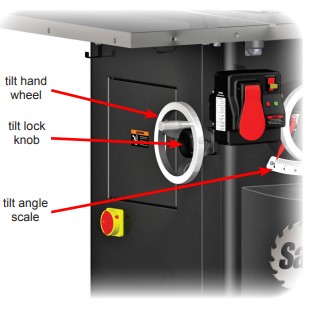
Adjusting Blade Tilt Angle
NOTE: Only 2 of the 4 saws are capable of changing the blade angle
- Blade tilt range The blade can be tilted from 0° (vertical) to 45°.
- Loosen the tilt locking knob before making any tilt adjustments.
- Use the tilt hand wheel to adjust the blade angle.
- Turn the hand wheel clockwise to increase the tilt angle.
- Turn the hand wheel counterclockwise to decrease the tilt angle.
- Use the tilt angle indicator and scale to verify the desired blade angle.
- Tighten the tilt locking knob to lock the blade at the selected angle.
- Built-in limit stops prevent the blade from moving past the 0° and 45° setpoints and should not be adjusted.
- Return the blade to vertical (0°) when finished using the saw.
- Lower the blade below the table.
Power Controls
- Two power controls are used on the table saw. The Main Power Switch energizes the machine, and the Blade Power Paddle Switch starts and stops the saw blade.
- Use the Blade Power Paddle Switch for normal operation. This switch allows you to start and stop the blade while keeping both hands on the workpiece. The blade can be stopped by pressing the paddle with your leg or knee.
- Do not turn off the Main Power Switch after stopping the blade. It is not necessary to shut off main power after using the paddle switch to stop the motor.
- Be aware of startup delay. If the Main Power Switch is turned off, the saw will run an initialization routine when turned back on. This may take several seconds—be patient.
- Leave the Main Power Switch ON for multiple cuts. If making several cuts, the Main Power Switch may remain on between cuts to avoid repeated startup delays.
- Turn off the Main Power Switch for service or adjustments. The Main Power Switch should be turned off when changing blades or performing any work on the saw to reduce the risk of inadvertent startup.
- Use the lockout key when appropriate. The Main Power Switch includes a removable lockout key to prevent unauthorized use. Pull the key straight out to remove it, and press it back in until it snaps into place.
- Understand lockout behavior. When the key is removed, the Main Power Switch can be turned off but cannot be turned on.
- Check the status lights before starting. The switch box includes red and green LEDs that indicate saw and safety system status.
- Operate only when system is ready. Start the saw only when the green “System Ready” light is illuminated.
- Report faults immediately. If the green light does not illuminate, notify maintenance personnel or the Floor Monitor and place an “Out of Order” sign on the machine. Signs are located on the wall near the maintenance room door.

LED Warning Lights
- System Initializing The saw is performing self-checks and arming the brake system. This normally clears within 15 seconds after turning on Main Power. Cold temperatures may extend this time.
- System Ready (Green Light) All checks are complete and the saw is ready to operate.
- Blade Coasting Down The blade is slowing but the brake is still armed. Do not touch the blade until it has fully stopped and this indicator clears.
- Replace Brake Cartridge The cartridge has been fired or is defective. Cycle main power once; if the condition remains, notify maintenance.
- Bypass Mode ON The saw is operating without brake activation to allow cutting conductive materials. Use only when authorized and trained.
- Start/Stop Paddle Not Reset The paddle was left in the ON position. Push it fully OFF to clear the condition.
- Cartridge Key OFF The brake cartridge locking key is not turned to ON. Notify maintenance.
- No Blade Rotation The blade cannot spin, often due to an open access door or safety interlock. Check covers or notify maintenance.
- Brake Cartridge Position Error The brake is improperly positioned, the blade is missing, undersized, or nonconductive. Notify maintenance.
- Contact Detected (Standby or Bypass) The system sensed contact with the blade or arbor. In Bypass Mode, this indicates the brake would have fired in normal operation.
- Material Conductivity Test If contact is detected repeatedly in Bypass Mode, the material is too conductive for normal operation.
- Wet or Green Wood Detected Excessively wet or green wood interferes with the safety system. Turn the saw off and notify a Floor Monitor.
- Key Rule, Only operate the saw with the green light on. If any other conditions persists, put an out of order sign on the machine and contact maintenance by filling out a Maintenance Request form located on the Maintenance room door.

Cleaning
- Turn off the saw and wait for the blade to stop completely.
- Clean the table surface to remove sawdust, pitch, and debris.
- Clear the surrounding floor area of sawdust, scraps, and offcuts.
- Inspect the dust collection intake to ensure it is clear and not clogged.
- Remove any accumulated debris from around guards and covers using a brush or vacuum.
- Leave the saw and work area clean and safe for the next user.
Safety Issues
- Flying wood and debris Offcuts, knots, or damaged material can be ejected at high speed during cutting.
- Kickback Improper technique, misaligned fences, or warped stock can cause the workpiece to be thrown back toward the operator.
- Blade contact Serious injury can occur if hands or body parts contact the blade while it is running or coasting.
- False sense of security The SawStop brake reduces injury severity but does not prevent accidents or unsafe operation.
- Conductive materials Wet wood, metal, or foreign objects can trigger the brake or create unexpected machine behavior.
- Improper setup Incorrect blade height, fence alignment, or missing safety components increase risk.
- Loose clothing and entanglement Clothing, gloves, jewelry, or long hair can be pulled into the blade.
- Unexpected startup Failure to use the main power switch or lockout key during adjustments can result in inadvertent blade movement.
- Noise and dust exposure Extended operation can cause hearing damage and dust inhalation if protection and dust collection are not used.
Only 2 of the 4 saws have blade angle capabilities, not all saws, and after returning the blade to 0 degrees a note should be added to lower the blade. #4653
Under the “user section” down to the fourth bullet point, the metal detector is on the right side of the door, not the left. #4653