Before operating the saw
- You are not wearing long sleeves.
- Safety glasses are on.
- Be sure that tools, scrape wood, etc. are clear from the work area.
- The pieces you are about to cut are free of nails or metal of any kind. There is a metal detector just to the left of maintenance room door.
- You have a “Push Stick” handy if one may be needed.
- The “Status Light” on the On/Off switch is GREEN (see below).
Adjusting the Blade Height
The first step in running a table saw is to set the blade cutting height. Below are two examples. The first is to have the top of the blade just above the piece to be cut. The second is recommended that the blade be set higher. This makes it less likely to- get kick-back, since fewer teeth have to contact the wood reduces the strain on the blade and motor.


Raising the Saw Blade
Use the “Elevation wheel” to raise or lower the blade height. Turn the hand wheel clockwise to raise the blade, and counterclockwise to lower the blade. Once at the desired height use the “Elevation Lock knob” to prevent the blade from inadvertently moving. Don’t forget to loosen the “Elevation Lock knob” before moving the blade. Always crank the blade fully down when you are finished.
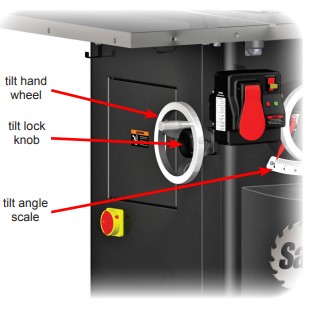
Adjusting the Blade Tilt Angle:
The tilt (bevel) angle of the blade can be adjusted between 0º and 45º. To adjust the tilt angle of the blade, loosen the tilt locking knob and turn the tilt hand wheel until the blade is at the desired angle. The tilt angle of the blade is indicated by the position of the tilt angle indicator on the tilt angle scale. Turn the tilt hand wheel clockwise to increase the tilt angle, and counterclockwise to decrease the tilt angle. Lock the tilt
angle by tightening the tilt locking knob. The saw includes limit stops to prevent the tilt angle of the blade from being adjusted past the 0º and 45º setpoints. These limit stops are pre-set at the factory and should not need adjustment. When finished return the blade to vertical position.
TURNING on MAIN POWER and STARTING the MOTOR

There are two types of “Power Switches” on the table saws. The Main Power Switch, which energizes the machine and the “Paddle Switch” which activates the saw blade for cutting. The “Blade Power Paddle Switch” is a safety device that lets you turn OFF power to the blade by pushing with your leg and thereby let you stop the blade without letting go of your work piece. It is not necessary to turn off the Main Power switch after pushing in the Start/Stop paddle to turn the motor OFF. If the Main Power Switch is turned off there will be a delay due to the initialization routine, be patient.
If you plan to make several cuts with the saw, you can leave the Main Power Switch in the ON position between cuts and avoid the delay.
The Main Power Switch should be turned OFF to reduce the likelihood of an inadvertent start-up when working on the saw, such as changing a blade. In addition, the Main Power Switch has a “Lockout Key” that you can remove to prevent non-authorized users from turning the saw on. To remove the key, pull it out, away from the switch. To replace the key, press it back into the socket until it snaps into place. When the key is removed, the Main Power Switch can be turned OFF, but it cannot be turned ON.
The Switch Box also includes red and green LEDs that display the current status of the safety system and saw. Only start the saw if there is a “Green Light” showing “System Ready”. If the “Green Light” does not come on you should notify a maintenance person, if one is in the shop, or the Floor Monitor and put an “Out of Order” sign on the machine, which are on the wall near the door to the Maintenace room.
LED Warning Lights

- System Initializing — this code indicates that the system is performing self-checks and energizing the brake system to activate in the case of an accident. This condition should clear within 15 seconds after the Main Power Switch is turned on.
- If the ambient temperature is very low (below about 0º F), this code may take longer to clear. The safety system detects such low temperatures within the brake cartridge. If necessary, the system turns on a heater inside the cartridge to raise the temperature of the electronics. This code will continue until the temperature inside the brake cartridge is within the normal operating range.
- System Ready — this code indicates that all self-checks have been completed, the safety system is operating properly, and the saw is in Standby mode ready to run.
- Replace the Brake Cartridge — this code indicates that the cartridge has already been fired or there is some other permanent defect that cannot be corrected. If the cartridge has not been fired, turn off the Main Power and turn it back on. If the error continues, install a new cartridge.
- Blade is Coasting Down — this code indicates that the blade is coasting down and that the safety system is ready to activate the brake if contact is detected. The safety system detects the rotation of the motor to determine when the blade is coasting down. If you touch the blade while this code is flashing, the brake will activate.
- ALWAYS MAKE SURE THE BLADE HAS COME TO A COMPLETE STOP AND THE COAST DOWN STATUS CODE HAS CLEARED BEFORE TOUCHING THE BLADE!
- Bypass Mode is ON — this code indicates that the saw is running in Bypass Mode and will not activate the brake in the event of accidental contact with the blade. Bypass Mode allows you to cut electrically conductive materials such as aluminum without activating the brake. When the saw is in Bypass Mode, the safety system disables the brake. See page 33 for instructions on how to use the saw in Bypass Mode.
- Push the Start/Stop Paddle to OFF — this code indicates that the Start/Stop paddle was left in the ON position (i.e., pulled out). Push the paddle in to the OFF position to clear this error. This is a safety feature to prevent the saw from restarting after a power loss or after the safety system has turned the saw off due to an error detected during use.
- Turn the Cartridge Key to ON — this code indicates that the cartridge locking key is not turned to ON. To clear this error make sure the cartridge locking key is correctly installed and turned to ON. See page 45 for instructions on how to install and turn on the cartridge key.
- No Blade Rotation — this code indicates that the motor is not able to spin the blade as expected when the Start/Stop Paddle was pulled out. The most common cause of this error is an open access door. Check to make sure both the Belt Access Door and the Motor Cover are fully closed and that the corresponding interlock switches are actuated. See page 26 for instructions on adjusting the position of the interlock switches.
- Adjust Position of the Brake Cartridge — this code indicates that the blade is too far from the aluminum brake pawl. To clear this error, adjust the position of the brake cartridge as described on page 18. This error code will also be displayed if there is no blade installed, if a blade smaller than 10 inch is installed, or if a nonconductive blade (e.g. abrasive blade) is installed.
- Contact was Detected During Standby — this code indicates that the safety system detected contact with the blade (or a portion of the arbor) when the blade was not spinning. This code will be displayed if you come into contact with the blade or arbor while the system is in Standby mode. The brake will not be activated and the code will automatically clear within 5 seconds after contact is ended. The system will not allow the motor to start while this code is displayed.
- Contact was Detected During Bypass — this code indicates that contact was detected while the saw was running in Bypass Mode. As described above, the brake will not be activated during Bypass but the safety system will continue to monitor for contact. If this code is displayed, then it indicates that the brake would have activated if the system had not been in Bypass Mode. This error will automatically clear once the blade has finished coasting down.
- Material Conductivity Test
- The “Contact Detected During Bypass” code allows you to “test” a particular material to see if it is too conductive to cut during normal operation. For example, if you have a new material you need to cut and are not sure if it is conductive, you can make several cuts in Bypass Mode. If this error code is displayed, then it means the material is too conductive and must be cut in Bypass Mode to prevent false trips of the brake. If the error code is not displayed after several trial runs, then it is likely that the material is not conductive and you can make future cuts in normal mode. (See page 33 for instructions on how to operate the saw in Bypass Mode.)
- Overload Due to Wet Wood — this code indicates that the wood being cut is too wet or too green. Very wet or green wood can interfere with the safety system’s ability to detect contact. The system monitors for wet and green wood and, if the wood is too wet or too green, the system will shut off the motor and display this error code. To clear this error, turn the Start/Stop paddle to OFF and turn the Main Power to OFF and then back to ON.
Saw Blade Types
There are different types of circular saw blades.
- Rip Saw: These have course teeth and are used for cutting with the grain of the wood. You will typically find these with 24 teeth on a 10 inch blade.
- Cross Cut: These have more teeth per inch and will give a much smoother cut with less chipping and tearing.
- Plywood blades: These are very fine-tooth blades specifically designed for plywood. Chipping and tearing on plywood is a common problem because the outer veneers are very thin. If you are cutting plywood on a table saw there is usually one side that is better wood. This side should be facing up so that the blade cuts down into it. Saw #4 is set up for plywood. And has an extension to the table on the left side to hold large sheets of plywood.
- Combination Blades: These usually have tungsten carbide teeth work well for both ripping and crosscutting, with minimal dulling over time.
- Daddo Blades: These come as a set and can be use together to give various width cuts. There are two “Normal circular blades to make the outer cuts which are separated by special blades that remove the excess material. You will need to remove the red access plate surrounding the saw blade and replace it with a wider “Daddo Blade” access plate available from the maintenance crew.
In general, the combination blades work well for all types of cuts unless you need to do very accurate cutting.
You can determine the type of blade a saw has by removing the red access plate around the blade and the number of teeth etc. is printed on the side.
Table Saw #4 is especially set up specifically to cut plywood by having an extension on the left side to hold plywood sheets. It is conveniently just outside the lumber room door.